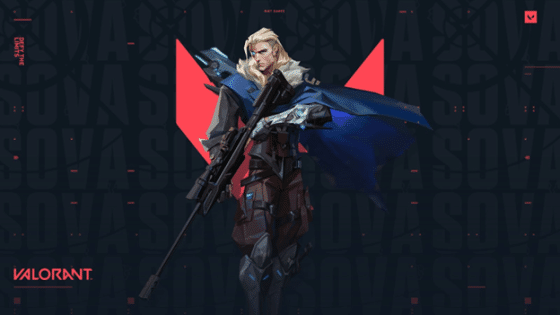
Mastering the Initiator Role- A Comprehensive Sova Guide to Dominate Haven in Valorant
| Tags: Valorant
| Author thealchemist

Here is how you can dominate every Valorant game on Haven as a Sova main
Initiators are the most tricky agents to master in Valorant. However, they are also the most rewarding once you get a hold of them. Valorant currently has five agents for the role of initiator. While they all have a unique set of abilities, the purpose of the abilities is the same for all five of them: to Initiate the play for your team.
Sova is the face of the Initiator role in Valorant, primarily due to being the first agent to be released in this category. The Russian agent is still in the meta for most maps three years after the game’s release. However, there are some maps where picking Sova is a no-brainer, and Haven is one of them.
His scouting abilities perfectly fit a map with spacious sites like Haven. Nevertheless, mastering Sova is not the most straightforward task. This agent has the highest skill ceiling, requiring a thorough understanding of the recon bolt and shock dart lineups, adept drone tracking, and strategic ult usage. Fortunately for you, we have crafted this Sova guide to equip you with all the essential knowledge needed to dominate Haven.
Recon Bolts (E)
The signature ability of Sova is the Recon Bolt. Upon landing, it will scan everything in its line of sight thrice, revealing the exact positions of the enemies. Below are the must-know lineups on Haven if you wish to main Sova:
(NB: Use the minimap for positional reference)
Attacking Side Lineups
A Long:
- Bounce: 0
- Charge: 1 Bar
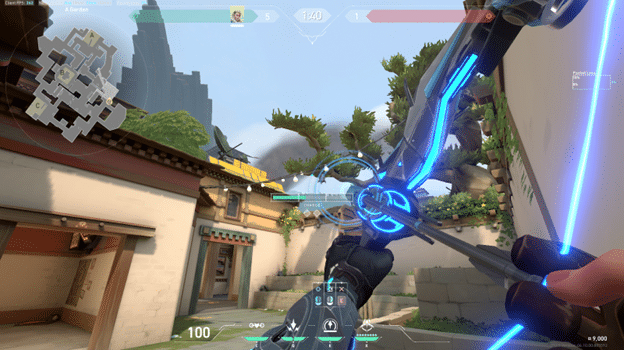
Position yourself at the corner of the box near the attacking spawn and place your crosshair in the middle of the two branches, like in the image above. Shoot with 1 bar charge and no bounce. This recon will scan anyone trying to play aggressively on A-main and give you easy control of A-long.
A Site:
- Bounce: 0
- Charge: 2 Bar
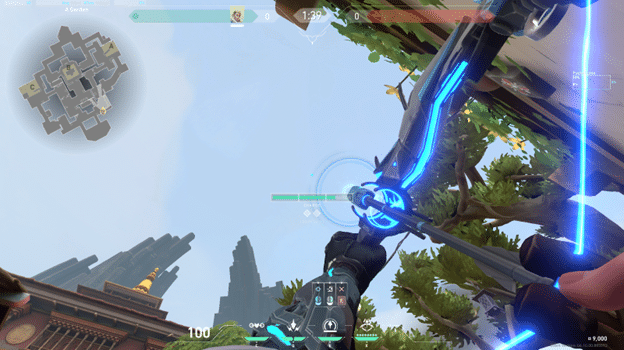
For this dart, you will need to hop on the platform with a jar on it in the garden area and align the line on the right side of the health bar in the gap between the leaves. Then, fire away the bolt with 2 bars of charge and no bounce. The dart will clear all of the site except the under-heaven area.
The only downside of this dart is that it takes quite a while to reach its destination. Hence, it is best to use this lineup at the start of the round for a fast A-rush.
A Site (Alternate):
- Bounce: 0
- Charge: 1 Bar
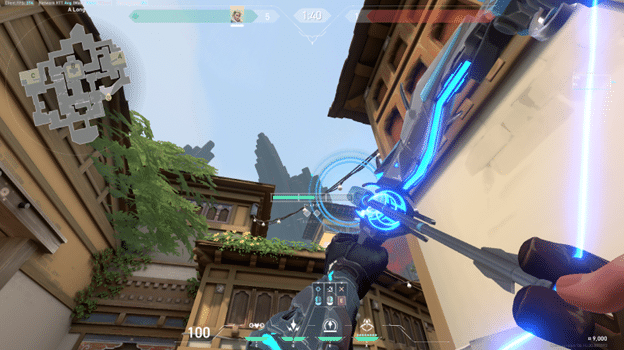
If you need a faster recon bolt for A-site, this is the one to learn. Position yourself on top of the sack near the A-lobby, align the left diamond with the bulb like the image, and shoot the arrow with 1 bar of charge and no bounce. It will clear the complete site except for the close A-short angles and under-heaven.
This is better to use in the mid or late round when you need a sudden execution to catch the enemies off-guard.
B Site:
- Bounce: 2
- Charge: 2 Bar
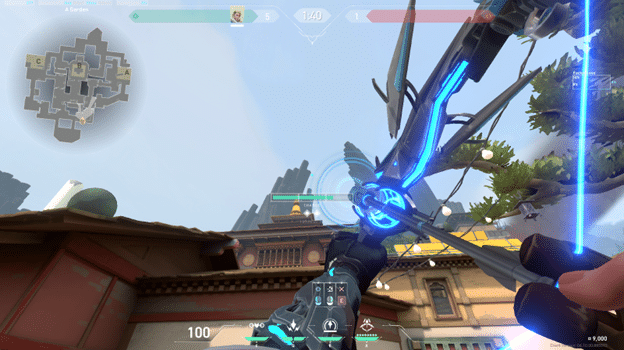
From the same spot as the A site recon, align the right diamond with the corner of the roof, and shoot with 2 bars of charge and two bounces. This recon will scan everything on the B-site except for the back area.
C site:
- Bounce: 1
- Charge: Max
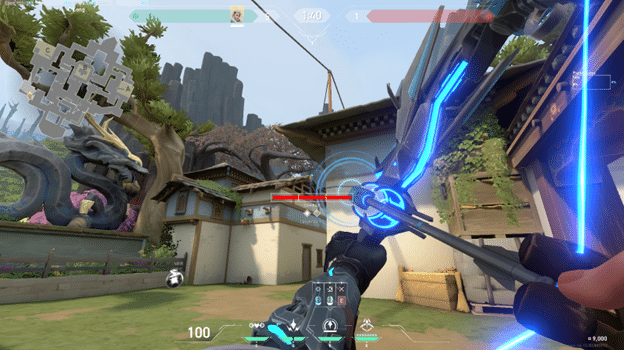
Position yourself on the corner of C-long and sidestep a little. Place the crosshair on the tip of the shed like the image and fire the arrow with max charge and one bounce. Make sure that you are crouched while shooting the arrow.
There is a reason this is called the God Dart. It will scan every angle, giving you complete site information. This recon, paired with a Breach flash and Jett dash, will get you the site almost every time, given that you manage to execute it properly.
Defensive Site Lineups
A Main Lobby:
- Bounce: 1
- Charge: Max
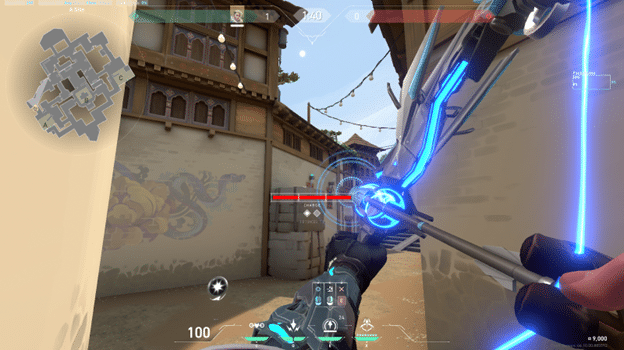
Aim just above the small wooden piece and fire the bolt with max charge and one bounce. This dart will scan any player in the A-lobby area. It helps the defending side with info on whether the opponent is rushing A or not.
A Main Garden:
- Bounce: 0
- Charge: 1 Bar
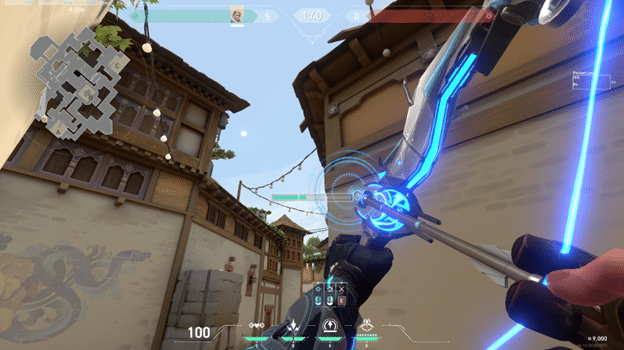
From the same place as the last one, position the bulb inside the left diamond and shoot with 1 bar of charge and no bounce. The recon will land on top of a tree branch at the A-garden area, giving you info on any players near A-lobby or B-window. If the enemy team is playing heavy default, this dart helps to get early knowledge of any lurk plays.
A Site Retake:
- Bounce: 0
- Charge: Max
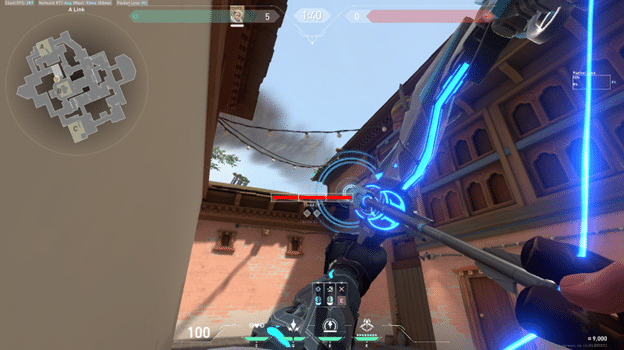
From the corner near the A link, place the crosshair slightly above the corner of the roof shed and fire with a full charge.
Retaking Haven A-site is extremely hard as the attackers have several angles to position themselves. However, with this recon bolt, the task becomes much easier as it will clear everything except the under-heaven (hell) part.
B Site Retake:
You do not need to learn any specific lineups for the B-site retake. Just shoot the recon at any walls of the site, and burst in with flashes. However, the site is tiny, so the enemy can easily break the dart. Hence, it is better to retake this site with the drone.
C Long:
- Bounce: 1
- Charge: Max
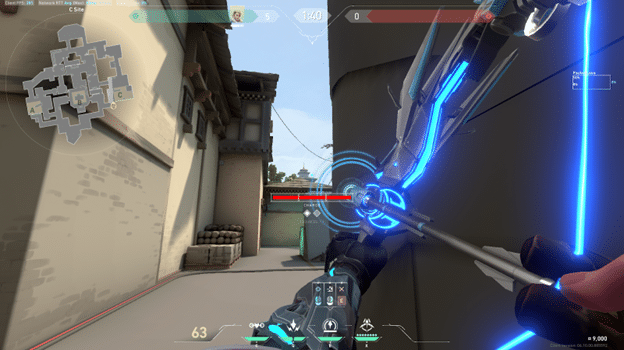
This recond bolt is for early C-long info. Crouch and align the left tip of the diamond with the line on the wall, similar to the image. Make sure that tip does not overlap the line. Max charge the bolt and give it one bounce. The bolt will fall on a tree branch in C long, scanning enemies in the long and lobby areas.
However, this is a rather unnecessarily complex lineup. If it seems too complicated, you can just fire the recon directly at C-long, which will do pretty much the same job.
C Site Retake:
- Bounce: 0
- Charge: 1 Bar
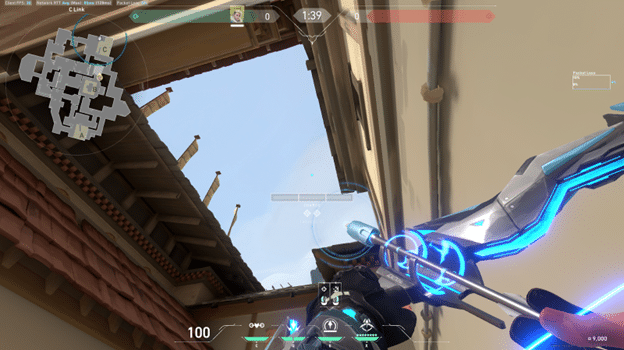
The C-site of Haven is arguably the best-designed site for recon bolts. Similar to the attack-sided lineup, this will scan every angle of the site. First, go into the corner of the C-link. Next, position the white dot above the left-click sign in the junction of sheds precisely like the picture above. Give it 1 bar of charge and shoot the arrow. This dart will clear every angle making the retake a cake-walk.
Owl Drone ©
Sova’s drone is the best scouting ability in Valorant. This 400 credits ability lets you equip a drone (breakable) for 8 seconds that can tag enemies and help you clear as many angles as you want in that duration. However, tagging enemies with the drone can be tricky if you are new to Sova. The remedy to that is simply practicing.
On Haven, there are many chokepoints where the Drone can prove to be a lifesaver. In both the attack and defense sides, buying a drone will help you a ton in initiating your team’s play.
Here are some example spots where you can use the drone to its maximum potential.
Defending Side

You can get the most out of Sova’s drone by using it to retake sites. However, try not to use the drone for early-round info, as you can use the recon bolt for that.
On Haven, all three sites can be scouted precisely with the drone from a safe spot. During a retake, position yourself just outside the site area near Spawn (for all three sites), and deploy the drone. It will enter the site as bait for your teammates while gathering information on anyone on the site.
Attacking Side
Playing as a Sova, your most important job during the Attacking half is to gather as much info as possible on enemies’ whereabouts before executing a site push. Utilizing your drone effectively can help a lot in this regard.

Charging blindly into a site without any info is futile against an opponent who knows what they are doing. So instead, to assist your duelist’s entry into the site, deploy your drone strategically to lure out the enemy’s location, increasing the likelihood of a successful site attack.
The most common drone spots on Haven for taking sites as attackers are the C-cubby, A-long, and Mid Courtyard (from the cubby). However, you can also use it to take control of crucial parts of the map, such as A-short and Garage.
Pro tip: Jump right before you fly your drone. This way, the drone can go higher than usual. It is useful in getting the drone over high walls and also to get a better vision.
Shock Darts (Q)
Using double shock darts lineups to kill enemies used to be the most satisfying experience in the game. However, double shock kill became almost impossible after the massive Sova-nerf that reduced the damage per dart. However, shock darts are still extremely useful even with lower damage due to their area effect. A well-timed and perfectly placed shock will do a chunk of damage to the enemies making it much easier to eliminate them with your guns.
Mastering shock dart lineups has lost effectiveness following the nerf, prompting a shift in the meta towards employing this ability situationally. Its usage now revolves around specific scenarios, such as flushing out enemies from corners and luring them into the open. Another example is to throw it onto the diffuser or the planter to do some chip damage.
Below are some of the situations most suitable for using shocks:
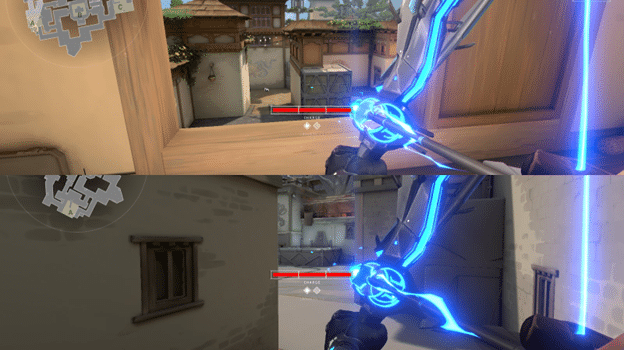
Ultimate (Hunter’s Fury) (X)
One of the few eight points ultimate, Hunter’s Fury is probably the most valuable ult in the game. It lets you fire three laser beams, and each of the beams does 80 damage. So a perfectly executed ult will almost guarantee a kill, giving you an instant man advantage.
Attacking Side
On Haven, employing Sova’s Hunter’s Fury against an enemy positioned on the site yields tremendous benefits due to the narrow nature of the sites. Both in pro plays and ranked games, the most commonly observed utilization of Sova’s ultimate ability during the attacking phase is to eliminate the player attempting to defuse the spike.

In all three sites of Haven, you can trigger your ult from a safe spot beyond the enemies’ immediate reach and swiftly neutralize the defuser. Even if you do not manage to eliminate, the ult still serves as a valuable tool by effectively stalling the defusal process, turning the round in your favor.
Defending Side
One of the most popular uses of Hunter’s Fury during defending is to kill the spike planter or at least delay the bomb plant. It can also be used to lure enemies out in the open during a retake. However, it is essential to note that Hunter’s Fury is not limited to these situations alone.

On Haven, where narrow areas like C-long or A-lobby are prevalent, the ult can be effectively triggered upon detecting the presence of multiple enemies in those areas. By capitalizing on the confined spaces, you can maximize the ult’s potential, inflicting substantial damage or even securing a multi-kill.
Follow ESTNN for guides, news, previews, and a lot of other content on Valorant.
